Blogger Blog by Switcher: Code | SoSwitcher

.
Showing posts with label Code. Show all posts

Blogger - Static Page Remove Read More


Blogger Static Page Remove Read More 1 Blogger Draft gave us static pages!

Along with the new Blogger Static Pages we get new issues while trying to merge the static pages with our Blogger templates.

One issue that was brought to my attention by David Bergeron in a comment here on SoSwitcher.blogspot.com was - How do we remove the “Read more…” link/text from the new Blogger Static Pages?

It took a few minutes to tweak the new template code, to remove the “Read more…” text/link from my new “Contact Me” static page (top left corner of this blog).

I doubt everyone has the exact same “Read more…” code in their template, so I’ll show the steps I took to fix this issue.

1) Backup your template.

2) Open your template in a text editor, I used the Blogger Dashboard text editor, & made sure to check the “Expand Widget Templates” checkbox.

3) In my browser I did a search for the text “Read more”, make sure to search for the exact text that shows in your blog (Read more, Continue, etc…)

4) My old “Read more"…” template code looks like this:

<b:if cond='data:blog.pageType != &quot;item&quot;'><br/>
<a expr:href='data:post.url'>Read more...</a>
</b:if>

5) My new “Read more…” template code looks like this:

<b:if cond='data:blog.pageType == &quot;static_page&quot;'><br/>
<b:else/>
<b:if cond='data:blog.pageType == &quot;index&quot;'><br/>
<a expr:href='data:post.url'>Read more...</a>
</b:if>
</b:if>


dxf file

Read more...

Blogger - How To Change Icon


blogger icon Want to change the default Blogger icon in your template?

1) First thing you need is a new icon! You can create your own image in whatever image editor you are comfortable with (Paint Shop, Inkscape, MS-Paint, etc…), make the image 16x16 pixels & save as a .png image.

An alternative is to search Google for a 16x16 pixel .png image that’s already finished.

Here is a Google Image search I did for the word star imagesize:16x16 , you can change the word star to any subject you like, just keep the rest of the search string the same:

(example = cell phone imagesize:16x16).

2) We need to convert our .png image into a .ico file (icon image). Go to the Dynamic-Drive website, & use their online converter to upload you .png image, & create your new .ico file (icon image). After the icon is created, download the new icon to your PC desktop.

3) Now that we have our new icon, we need to upload the icon, to the internet. Blogger won’t let us host our own .ico file so we can use Google Sites for our host, you can follow a blog post I did Blogger - Host Javascript File for Free , this link will show you how to host your own files online for FREE, you do not need to change the extension for this tutorial, your icon URL should look something like this:

http://sites.google.com/site/YOUR_GOOGLE_SITE/PAGE1/YOURICON.ico


4) Paste the code below into your Blogger template just below the <HEAD> tag


<!-- Favicon -->
<link href='http://sites.google.com/site/YOUR_GOOGLE_SITE/PAGE1/YOURICON.ico'
rel='shortcut icon'/>
<link href='http://sites.google.com/site/YOUR_GOOGLE_SITE/PAGE1/YOURICON.ico'/>
<!-- end Favicon –>


NOTE: Make sure to change both of the URL’s to your own links, from your Google-Sites webpage. Press the Save Template button in your Blogger editor. Make sure when you paste the code into your Blogger template, that you have four individual lines of code, if the lines are broken you will get an error message in the Blogger Editor.

That’s it!

Visit your blog & you should see your new FAV icon at the top of your browser window.


Technorati Tags: ,,


dxf file

Read more...

Blogger Meta Tag


meta tags no blogger,agregar meta tags blogger,add meta tags blogger,blog meta tag,blogger title tag,blogger meta description,blogger seo,wordpress meta tag

I’ve been busy working on a really cool bit of Blogger Meta Tag code, the last couple of days. This new code will let me control all my meta tag content dynamically with the exception of my blogs homepage, which will have its own static meta tag content, that is still totally customizable.

What's all this mean, why do I need this?

The old way of creating Meta Tags for a Blogger Template, will only let us set the Meta Tag content for all of our Blogger blogs, as single Meta Tags, that shows the same content on every single blog page.

My new improved code will automatically write this dynamic content to the Blogger template for each individual blog page:

  • TITLE
  • Description Meta Tag
  • Keywords Meta Tag

1) Title Tag = Blog Post Title + Blog Post Labels + Blog Title

2) Description Meta Tag = Blog Post Title + Blog Post Labels + Blog Description

3) Keywords Meta Tag = Blog Post Labels

The Blog Title pulls it’s content from Blogger Control Panel –> Settings –> Title. The Blog Description in the Meta Tag Description pulls it’s content from the Blogger Control Panel –> Settings –> Description. All the Label content pulls it’s content from each individual blog posts labels, so we use those Labels as Keywords inside the Meta Tags.

What all this does is provide Google our own unique content & keywords, that have a very good chance of showing up inside the Google Search results Pages description, just below the Title. The reason I say a very good chance of showing up is, it’s impossible for any website on the net to force Google to use content. With the Meta Tag Description, Google most times will look for that tag & use it in the SERP.

I’ve had my new Dynamic Meta Tags crawled by Google & already showing up in the Google SERP (Search Engine Results Page), after only a few hours of testing.

The image below, you can see a screenshot of my new Meta Tag content, from my last blog post

Blogger – Change your Tools

meta tags no blogger,agregar meta tags blogger,add meta tags blogger,blog meta tag,blogger title tag,blogger meta description,blogger seo,wordpress meta tag

My intention is to have Google notice my blog for a wider dynamic selection of keywords & phrases, than my old static template. I’ll wait about a month & keep monitoring how Google Search handles the content in my SERP results, before I post any code for others to use on their own blogs, I want the code to be 100% up & running with results to show everyone.

Keep an eye out for related future blog post.

While I’m tweaking the code, have a look thru this blogs source code, to check out how every single page on this blog has dynamic Meta Tags & Page Titles (no two pages are the same).

Technorati Tags: ,,,

dxf file

Read more...

Blogger – Better Google Sitemap


Google SitemapBlogger & Google Sitemaps will allow your Blogger blog to get indexed by the Google spider with very few  problems. Did you know that the Blogger code for the default sitemap, that you submit to Google Webmasters Tools only allows the first 26 pages of your blog to get indexed by the Google spider?

That’s right …

If you are using the default code as your sitemap in Google Webmaster Tools, your site is missing out, for every single page that is over the 26 page limit. So say I have 150 pages on my Blogger blog, the math says I’m missing out on the opportunity to allow the Google spider to crawl 124 additional Blogger pages, on my blog!

I’m ready for change …

I actually found out that I was allowing my Blogger blog to be short changed by the Google spider, on one of my other Blogger blogs, & this wasn’t only a few pages, it was a huge amount of pages, in fact my blog was over 400 pages long, & out of those 400 pages I was only allowing the Google spider to crawl 26 of my latest blog post.

Whooooa… STOP THE BUS!

The default sitemap code looks like this (see red/bold text below):

1) http://YOUR_BLOG_NAME_HERE.blogspot.com/atom.xml?orderby=updated

The code above is all good, as long as you have less than 27 blog post, but the fact is you’ll quickly find that you will with no doubt exceed that maximum limit at some point in your blog.

From all my research & trial & errors, on all my Blogger blogs for well over a year & a half, I’ve found the code below to be a better alternative to the default Blogger sitemap code. The new code will break the sitemap down into multiples of 100, so for every 100 pages on my blog, I need to tweak the sitemap code a little bit.

New sitemap code (Google spider crawls the first 100 blog post)

1) atom.xml?redirect=false&start-index=1&max-results=100

So in the new sitemap code above, we start with the very first blog post (start-index=1) & now allow the Google spider to crawl to page 100 (max-results=100).

Say you have over 100 blog pages, what you need to do is submit additional sitemaps for the same blog at the Google Webmaster Tools website. As an example I have a Blogger blog that has over 400 pages, for that blog I have 4 sitemaps, that look like the code below.

1) atom.xml?redirect=false&start-index=1&max-results=100

2) atom.xml?redirect=false&start-index=100&max-results=100

3) atom.xml?redirect=false&start-index=200&max-results=100

4) atom.xml?redirect=false&start-index=300&max-results=100

Notice how each new sitemap starts at a higher start-index, by 100 blog post. So for the sitemaps I have, I’m covered for the first 400 blog post of my Blogger blog.

Below is a screenshot of my sitemaps, for one of my blogs that has over 400 pages.
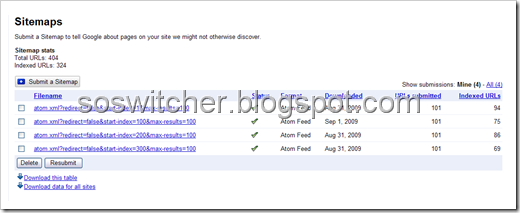
sitemaps

NOTE:

When you submit sitemaps to Google Webmaster Tools, for a Blogger blog. Google won’t crawl your Blogger Labels, that’s the reason why every page isn’t being crawled in the screenshot above.

This new sitemap code has greatly improved how Google crawls my blog, I went from having only the first 26 pages of my blog crawled to now having 324 pages crawled by the Google spider.

I have internal links hard coded into my template, on every blog page, so it’s important to me to allow Google to crawl as many pages as possible, as often as possible. I also have widgets that have text that changes often, that text also is picked up by the Google spider, which allows my blog to show a massive amount of relevant keywords, for my Blogger Blog.


dxf file

Read more...

Blogger - Increase Your Label Limit Per Page


LabelLimitHave you ever wanted to show all of your blog post from a single Label? 

It’s actually very easy to show all the blog post from one label, on a single webpage in Blogger, here’s how:

1) First we need a Label from our own blog, I’ll use the Label Blogger from this blog, as an example.

2) Next we need the URL/link of our Label, so for my Label Blogger, I go to my blog that already has a link to my Label (Blogger), & Right click –> Properties then copy the URL. My Blogger Label URL/Link looks like this: ( http://soswitcher.blogspot.com/search/label/Blogger )

Notice the name of my Label at the very end of the URL/Link (Blogger), that Label can be any Label that is on your own blog. Also you should know, that Labels are case sensitive.

3) Here is how we control the maximum number of Blogger blog post for a specific Label, on a single page. We already have the URL/Link from our Label (Blogger), now we need to add this small bit of code to the end of the Label ?&max-results=3 so now our Labels new URL/Link will look like this:

http://soswitcher.blogspot.com/search/label/Blogger?&max-results=3

The example URL/Link above will return the last three blog post from my blog, click here to see.

4) The last step is to put our new Label URL/Link into HTML code so we can use the link anyplace inside our blogger post, or a Blogger HTML/Javascript gadget. Here is how to do that:

<a href="http://soswitcher.blogspot.com/search/label/Blogger?&max-results=3">Blogger Label=3</a>

This text ( Blogger Label=3 ) can be anything you want it to be.

A few examples from my Blogger Label:

NOTE:

In my example above I have a total of 11 blog post on this blog that include the Label Blogger, so any number higher than 11 will still only show 11 blog post. This can be a good thing, If you want to show a fixed amount of blog post (example=30).

Just remember it’s annoying to have a single webpage with long blog post that runs on forever, so don’t over do it. :)

Again, all Blogger Labels are case sensitive, so make sure you don’t use blogger instead of Blogger, for our example, because my Blogger Label started with an uppercase B.

Technorati Tags: ,,

dxf file

Read more...

Blogger – Title Labels Page Title SEO


Better Page Title Blogger

The Blogger Page Title by default isn’t SEO friendly to say the least. I added a Title tag code snippet to my blogger template ( Blogger - Change Page Title Tags for your Blog ) a while back. Everything looked good on my Page Title, but when I did a Google search for each of my page Titles, my blogs homepage always showed up, instead of each specific page Title, in the Google search results, which wasn’t what I wanted at all!

The answer…

I started searching for a better way of handling my blog page Title problem, what I found was a snippet of code that would change everything about my page Titles in a far better way than I was looking to accomplish. This new code snippet not only added my blogs specific page Titles to all my Google searches, for my blogs page Titles, it also added all my Labels to my Google Search results (Very Cool)!

By adding my Blogger Labels to the Title of each page, I’m adding keywords to the Google search results, so that moves my blog post one step closer to the top of Google search.

The code…

Below are the steps to add your Labels to your Blogger page Title:

1) Backup your blog template .xml file, to your local PC

2) Go to your Blogger Dashboard & Layout –> Edit HTML

3) Find the <title><data:blog.pageTitle/></title> tags at the top of your template, & delete them.

4) Add this code, above the <head> tag, at the top of the template :


<!-- Start Widget: Changing the Blogger Title Tag -->
<b:if cond='data:blog.pageType == &quot;item&quot;'>
<b:section id='titleTag'>
<b:widget id='Blog2' locked='false' title='Blog Posts' type='Blog'>
<b:includable id='nextprev'/>
<b:includable id='backlinks' var='post'/>
<b:includable id='post' var='post'><data:post.title/></b:includable>
<b:includable id='status-message'/>
<b:includable id='comment-form' var='post'>
<div class='comment-form'>
<a name='comment-form'/>
<h4 id='comment-post-message'><data:postCommentMsg/></h4>
<p><data:blogCommentMessage/></p>
<data:blogTeamBlogMessage/>
<a expr:href='data:post.commentFormIframeSrc' id='comment-editor-src'/>
<iframe allowtransparency='true' class='blogger-iframe-colorize blogger-comment-from-post' frameborder='0' height='275' id='comment-editor' name='comment-editor' scrolling='no' src='' width='100%'/>
<data:post.friendConnectJs/>
<data:post.cmtfpIframe/>
<script type='text/javascript'>
BLOG_CMT_createIframe(&#39;<data:post.appRpcRelayPath/>&#39;, &#39;<data:post.communityId/>&#39;);
</script>
</div>
</b:includable>
<b:includable id='backlinkDeleteIcon' var='backlink'/>
<b:includable id='postQuickEdit' var='post'/>
<b:includable id='main' var='top'><head>
<title>
<b:loop values='data:posts' var='post'>
<b:include data='post' name='post'/>
<b:if cond='data:post.labels'>&#8212;
<b:loop values='data:post.labels' var='label'>
<data:label.name/>
<b:if cond='data:label.isLast != &quot;true&quot;'>,
</b:if>
</b:loop>
</b:if>
</b:loop> &#8212;
<data:blog.title/>
</title>
</head></b:includable>
<b:includable id='commentDeleteIcon' var='comment'/>
<b:includable id='feedLinks'/>
<b:includable id='feedLinksBody' var='links'/>
<b:includable id='comments' var='post'/>
</b:widget>
</b:section>
<b:else/>
<title><data:blog.pageTitle/> AnyCustomTextHere</title>
</b:if>

<!-- End Widget: Changing the Blogger Title Tag -->


5) Replace the text AnyCustomTextHere in the new code snippet (towards the bottom of the code), with any text that you would like to show at the end of your blogs Title.

Note:

This code does have a couple of things I don’t really like, still it does a much better job at blog post SEO than the default Title tags, or any other Title tags I’ve tried on any of my Blogger blogs, not to mention adding all your Blogger Labels into Google Search results :

  • If you want to change anything on your Blogger Dashboard Layout (edit gadgets, etc…) make the changes, but don’t click the SAVE button at the top right side of the screen. Blogger should still save your changes.
  • If you want to add any new gadgets to the Blogger Layout, remove the entire Title code snippet, from the Blogger HTML editor, then save your template, paste the Title code snippet into another text editor (Windows Notepad), until you are done adding gadgets in the Blogger Dashboard Layout, when finished adding gadgets, replace the Title code snippet you saved inside of Windows Notepad.
  • This new Title code snippet will also add all your comments from each blog post, to Google search results, I don’t like this feature & have tried to remove it, only to have blogger keep adding the code back to my Title tags, in the template, this is probably my biggest complaint about this code snippet, because each time someone adds a comment to your blog post, it will change your blog post rank in the search engines for better or worse.

Update:

Here is a link to a 2nd text file that includes similar code as this tutorial, this new code will only return Blogger Labels in the Page Title,  everything installs the same on both versions.

(Download Blogger Labels Only - File)

Update:

Here is a link to a 3rd text file that includes similar code as this tutorial, this new code will only return Blogger Titles (without labels) in the Page Title,  everything installs the same on all versions.

(Download Blogger Without Labels - File)

Technorati Tags: ,,,

dxf file

Read more...

Blogger Ad Code Converter


Have you ever wanted to add Google Adsense code inside your Blogger Template, & found it’s not a simple copy & paste job?

Well, now your in luck!

I built a Google Widget that will allow you to convert Google Adsense code into Blogger xhtml code, & not only that, you can also add the Blogger Code Converter to your webpage or blog, since it’s a Google Widget.

The code converter is simple to use:BloggerCode

  • Copy the code you want to convert (Right click – Copy)
  • Paste that code into the code converter textbox (Right click – Paste)
  • Press the button at the bottom of the widget “Convert Code
  • (Right click – Select All) of the converted code in the Code Converter textbox
  • (Right click – Copy) the converted code in the Code Converter textbox
  • Paste the newly converted code into your Blogger template, etc…

I’ve added the New Google Code Converter to my sidebar, on the lower right side. The Code Converter size can be adjusted, when you go to get the code from the Google button below.

Note:

It’s up to anyone that uses this widget to double check the Google Code Converter Widget code, for any mistakes, I’ve been working with this for a while, with no problems. Please let me know of any issues or suggestions you might have, with this widget, by adding comments below.

You can click on the Google button below to add this Widget to your own blog.

Blogger Code Converter Widget


dxf file

Read more...
 

Labels

Recent Comments

.

© 2012